WORK IN PROGRESS
At this point in the exercises, as we have been working with depth of field, its important to explain the difference between Depth of Field and Depth of Focus
Here is one definition:Source; The American Cinematographer Manual 1973; Page 625
DEPTH OF FIELD – The range of object distance within which objects are in satisfactory sharp focus, the limits being the establishment of a circle of confusion of greatest acceptable size
DEPTH OF FOCUS – The range through the image plane (the emulsion of the film) can be moved backward and forward with respect tot he camera lens such as defined under the depth of field and circle of confusion, this term is often confused with depth of field and visa versa
Also further reading; Basic Photography by Michael Langford 7th Edition; page 49
Basically, in English, this means that Depth of Field relates to the amount of image that is sharp, depending on where the camera is pointed, aperture setting and distance from subject. Whereas, Depth of Focus relates to the mechanics inside the camera and the distance the projected image is, in relation to the image sensor and its ability to maintain the same focus.
Exercise 2.7 – Brief
Use a combination of small apertures and wide lens to take a number of photographs exploring deep depth of field. Because of the small apertures you’ll be working with slow shutter speeds and may need a tripod or rest your camera on a stable surface to prevent camera shake. Add one or two unedited sequences, together with relevant shooting data and an indication of your selects, to your learning log.
I visited various sites over 2 days, Dearnford Lake, Jubilee Park, Ellesmere Lakes, Whitchurch Railway Station. I decided to use landscapes/water for this exercise to challenge my ability to shoot scenes that make it hard to define depth and distance. Large trees may be interpreted as small bushes and lakes as puddles, unless you use other structures around to give scale. Composition is also important and something I had to think about, as photographing large bodies of water, and trees that look like sticks, especially in this time of year, when the trees are still a little bare of leaves. Colour also comes into the equation, spring may have sprung, and daffodils are rearing their heads, but scenes like this can still be a little lacking in colour and can be a little boring for the viewer.
It was a really sunny day, and I knew as I set off, that it would not be an easy task, using small apertures with slow shutter speeds, in weather like this. I love the bright sunlight but my camera has little gremlins inside that play around with my exposure, and cause me to say naughty words like…… piggin nora, or words to that effect!
On arriving at my first port of call, Jubilee Park, I had planned to get to the top of the gardens section and take photographs of 3 views, to left of pagoda, the centre, and to the right of the pagoda. I had never been up to the top, over looking the park before, as it seemed a little steep for me, but it would be a new experience, and I needed to get that shot. As I walked through the park gates I saw the council had decided to send half a dozen men to paint the pagoda. I asked them if they minded having their portrait taken, as I was here to photograph the park. (I used the word portrait after listening to Simeon Quarrie talk at the NEC, he said that people were more accepting when you used the ‘portrait‘ rather than photo as it makes them feel special-ish)
I managed to get up the ramp, but there were a few steps at the top and I had problems getting my wheeled zimmer up there, but in the end I managed. I set up and put the setting in my camera. I decided to work on manual setting for some of the shots and then went to aperture priory.

The setting for the test shot seen on the left were; ISO 100; 18mm; f/22; 1/4
As can been seen, this over exposed the shot. I worked through changing the shutter speed settings one at a time, by the time I got to f/10 the image on the right was the result, still over exposed. The histogram was all over the place. (read more on the histogram, click here). Finally the setting best suited for the environment is the image below set at;
ISO100 18mm f/22 1/25
I normally shoot in both RAW and Jpeg, so I can view the image after shooting. One of the problems that occur when shooting in this type of environment is that the screen on the camera reflects the sunlight and you don’t get a true reading of the image. It shows as very dark. I find I have to shade the camera with a scarf over my head to be able to see the image I am displaying, especially when you need to enlarge the picture on the camera to check the focus.
I wanted to get the houses on the horizon in the shot. I used the two small bushes in front of me as a point of interest. Using objects like this gives an impression of the horizon being far away, adding depth to the picture. Having the workmen in the image, is a little blessing in disguise, as the viewer can use them as a scale on the depth, size of the trees as so forth. Its always good to have something that gives scale to images that have depth.
 The photograph on the left has the wall and bushes as a point of interest at the forefront, while the houses in the middle distance give it depth. I used the sculpture in the right 3rd and the flowers on the bottom 3rd to give balance and a little added colour to the scene. Read more on this, click here
ISO100 18mm f/22 1/20

The image on the right is the final image of this sequence. I used the path to lead the eye to the house at the end of the path. There is no foreground interest as I did not want to distract anything from leading the eye up the path into the distance. The lines work well, giving depth and distance to the image, while the house gives scale. The trees either side give a natural frame to the whole scene. (Read more on line and depth Click here.) ISO100 18mm f/22 1/10
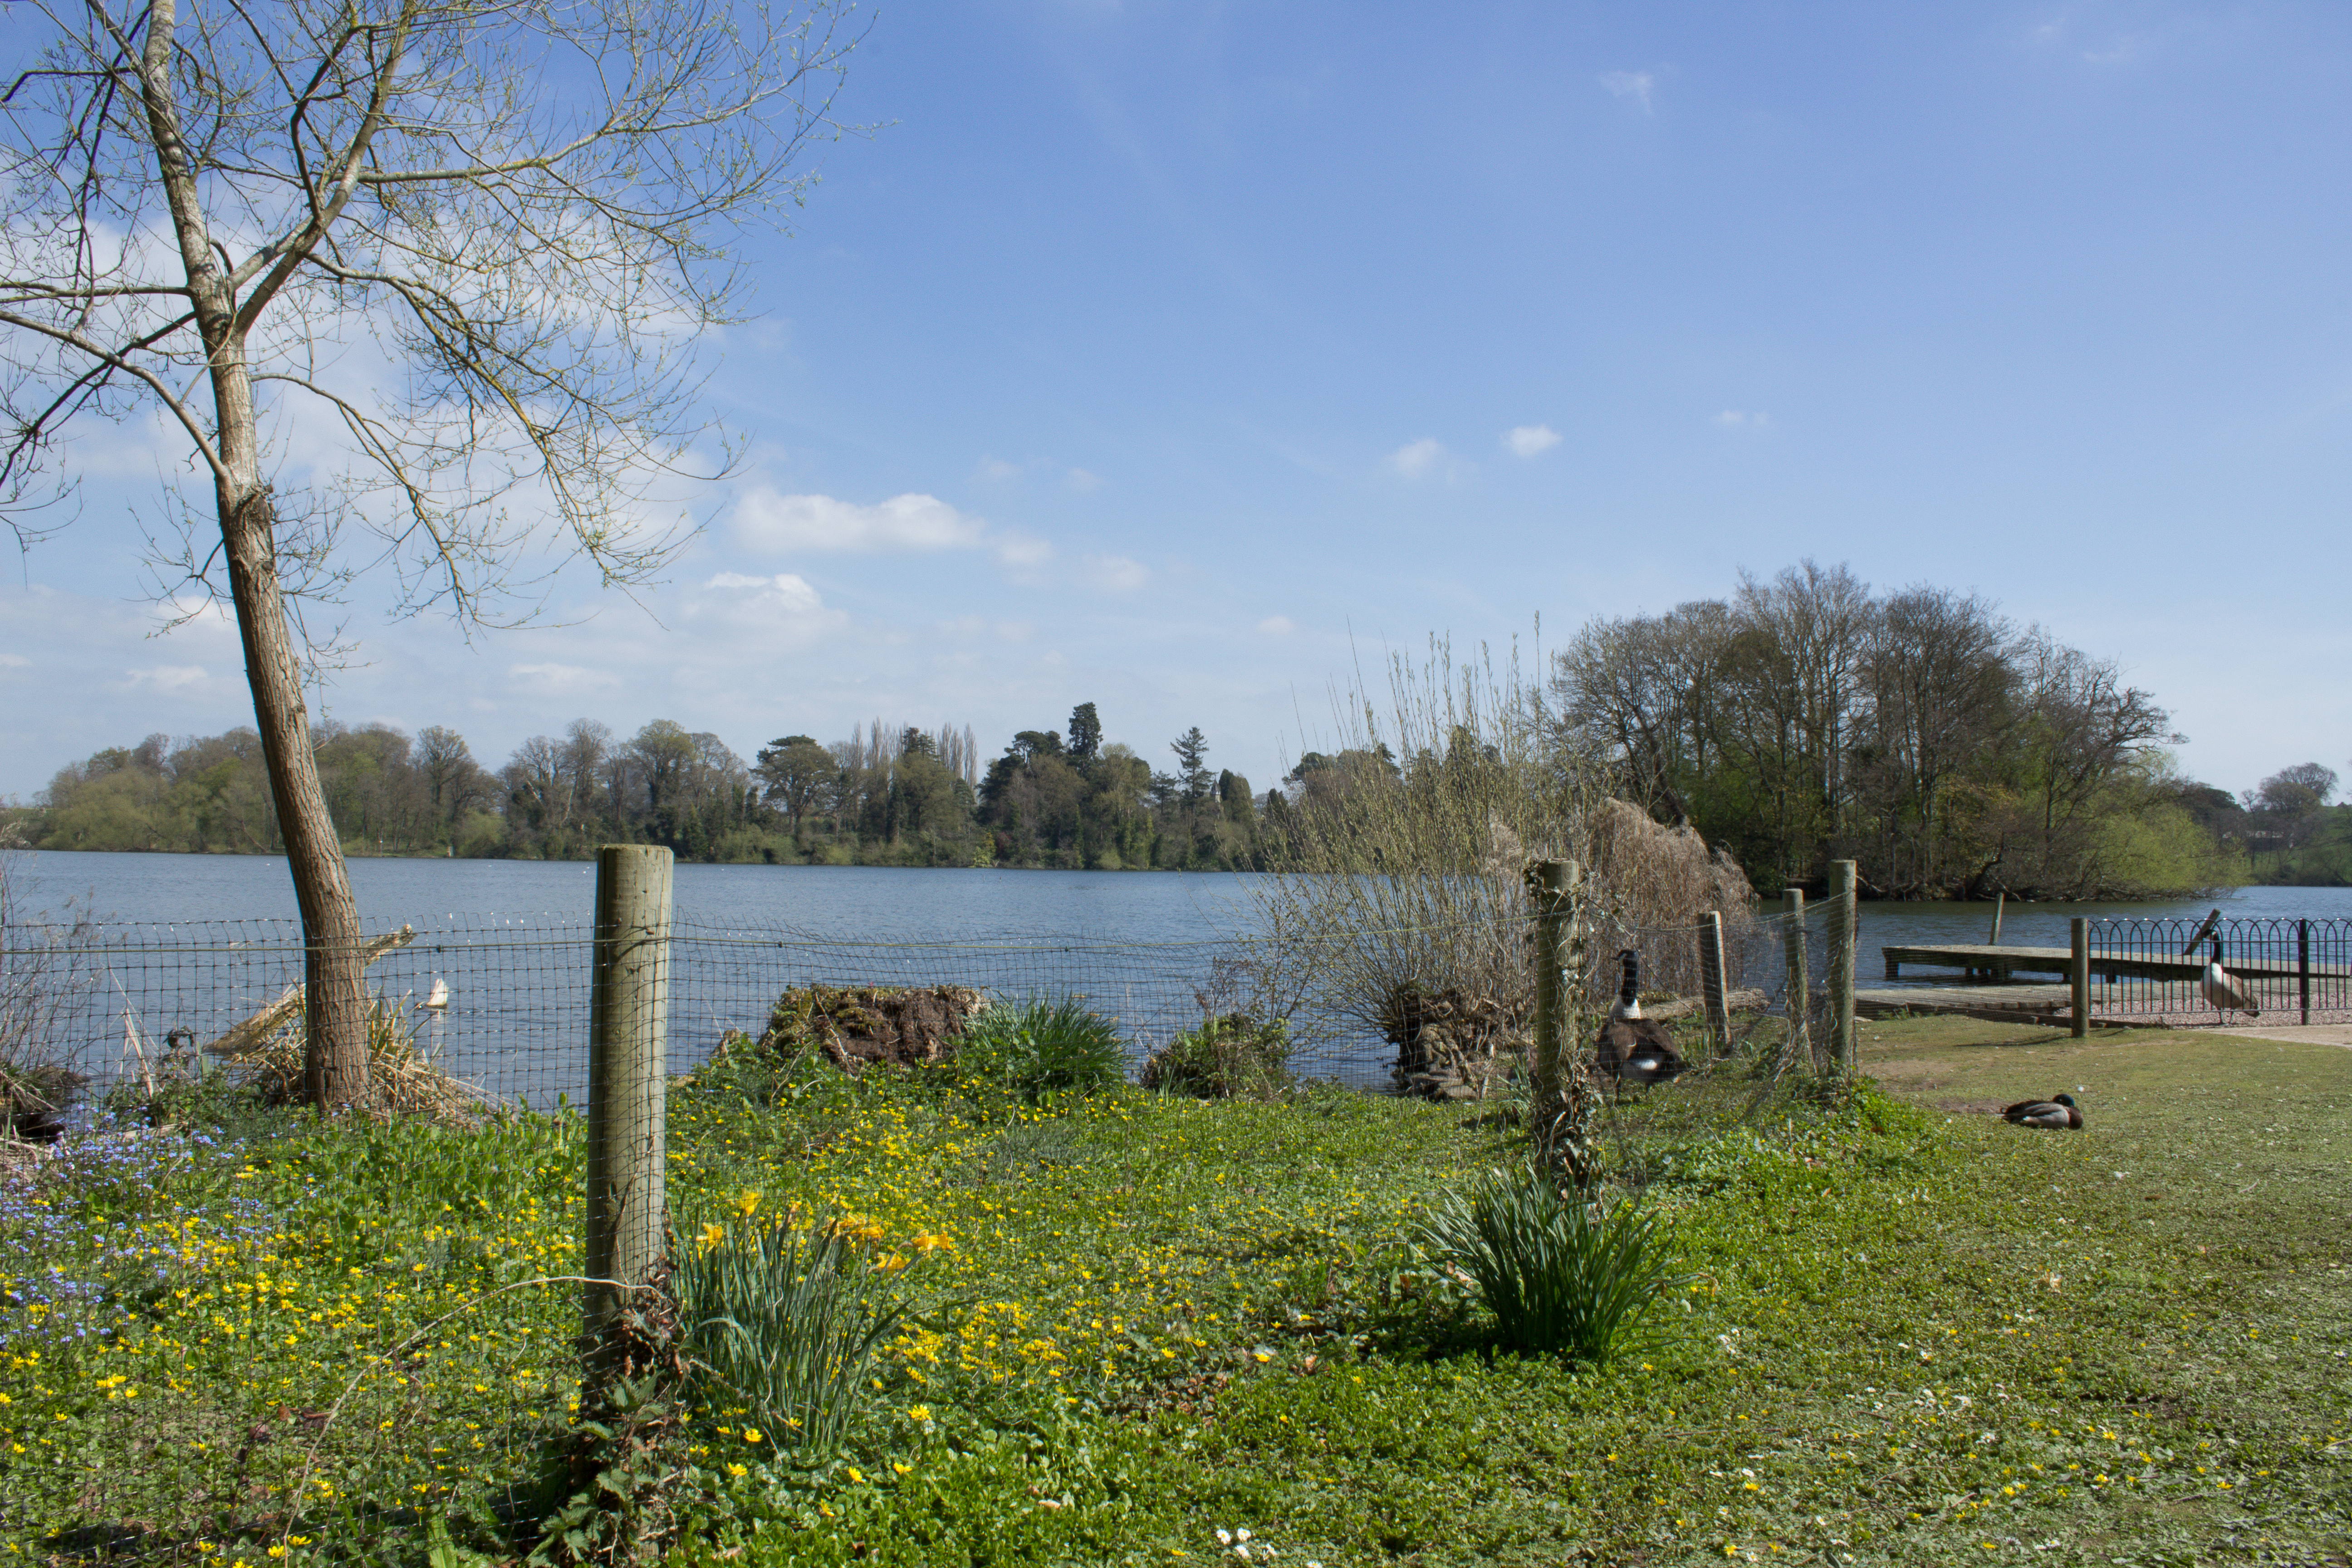
One of the places I visited was Dearnford Lake. A large lake sporting an island in the centre. The day was cloudy, dull and windy, but thankfully no rain. The weather/light available would have an effect of what setting to use. I took photographs to the left side of the lake, and to the right, using the large boulder as a point of interest in the foreground. Grey/blue skies and water, together with brown/black colours in the foliage can be a little boring, so the green grass in the foreground was used to add a little colour. The tree on the island and the boulder work well in giving balance to the scene against the green grass. The gap between the reflection of the trees on the right and the pier, lead you to the woods in the far distance.

In the second image of Dearnford Lake, I used the natural curve of the bank, going from left to right and sweeping the eye to other side. The life buoy gives scale to the scene, otherwise the very large trees on the horizon could easily be mistaken for small bushes.
Checking to see if the whole image was in focus, I used the facility built in the camera, by going to view image and then using the +button to enlarged it. On the first image I zoomed in on the upper left hand side, to enlarge the pier, sign and blue slide. Although it was in focus, I think it could have been sharper. The image to the right below, is a cropped version of what I was looking at. Again when taking the photograph of the other side of the lake, I checked the life buoy hanging almost opposite me, to see if it was in focus. Using PhotoShop, the two photographs below where cropped drastically from the original image, to show the extent of the focus/sharpness that I would have been looking at in the camera display screen. Cropping has an effect on the number of pixels in an image, so some of the blurryness/out of focus in these two images may be as a result of cropping. (More can be read on this subject Click Here)

Ellesmere Lake
Ellesmere Lake is very much like Dearnford Lake, only bigger. Again it has an island in the centre, with lots of wild fowl around, waiting for passers-by to feed them. I chose 4 spots to set up my tripod. Again it was a very warm sunny day.
 The shot on the left was taken as you enter. I thought the posts would make an interesting foreground interest, while the island acted as a go between the near and far. The wild fowl added some interest too. I hoped the small tree on the left would balance the scene, its just such a shame that it had no leaves as it would have provide better balance against the island.
ISO100 18mm f/22 1/30
The image on the right show depth as the path leads the viewer far into the distance. The people walking towards me and the building give scale without being obtrusive. The tree on the left, behind the building adds height and balance against the row of trees to the right. ISO100 18mm f/22 1/30
 In the image on the left I used the life buoy to add colour in and foreground interest to this mainly blue shot. Between the sky and the water blue is the dominant colour, with a little greenery from the grass and trees in the distance. The lines of the pier point in the direction of the trees on the other bank, as, in a way, does the life buoy with its shadow almost as a finger guiding the viewer where I want them to look. ISO100 18mm f/22 1/30
Read more on where we look first

Although the image on the right has some depth, it didn’t turn out as good as I thought it would. The island seems to stop the eye from going right over to the other bank. I was hoping that the building would be of some interest, with the fence leading the eye to it, but it doesn’t really work for me. It has some aesthetic interest, which is brought about by the calm lake and water fowl.
ISO100 18mm f/22 1/25
Whitchurch Railway Station
 An exercise on depth and distance, would not be complete without train lines…….. especially if the seem to carry on forever. In the image on the left, taken from the top of the stairs, I have used the stairwell as a lead in to the platform and railway lines, taking the viewer off on a journey in the distance and nothingness. The trees on the right and the buildings on the left go a long way into helping guide the viewer further.
ISO100 18mm f/10 1/125
ISO 100 18mm f/13 1/125

